Designs for my kiddos
Quick Links to projects on this page:


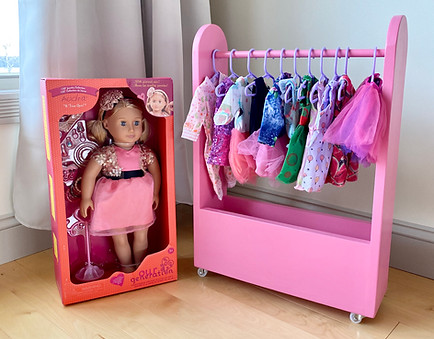
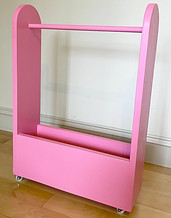
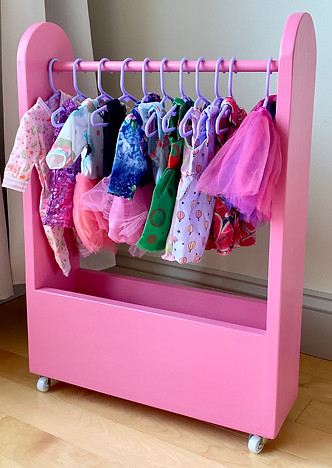
Dress up bin
My kids use this ALL the time. They love to dress up. I used Ana White's plans. I added castors (which allows my kiddos to drag this bin all around the downstairs for their dress up productions) and some easy stenciling added a tiny bit of sweetness.

Simple Kids' Desk
I was looking for an easy solution for a desk in my kiddos' play room. After finding bins that were the perfect height, I had 1/2" plywood cut to fit the space, chairs, and bins perfectly. I added a round dowel in the middle to help provide support, and anchored the entire thing to the wall. It's definitely not a piece of furniture my kids are allowed to climb on, but it serves its purpose well.
The chairs came from an IKEA set
The bins at the end of the desk are from Target
Play Marketplace & Puppet Theater
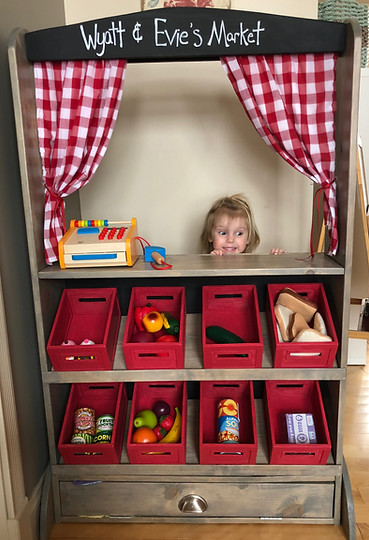

I wanted to make my kids a combined puppet theater and market place, but I didn't like any of the options on Pinterest. I found the perfect one in a store based out of England, but with the shipping it was too expensive. So I decided to try to replicate it.
It was not an easy endeavor because at the time, I didn't have any of my power tools to help me. The basic frame is made out of a 1x10, which I rounded over at the top with a jigsaw I ended up buying for the project. The top is constructed out of two rounded over 1x4's painted in chalkboard paint, and in between them I put a dowel to hold the curtain. I needed to stabilize the unit, so I made rounded over "feet" on either side.

Marketplace:
I found the unfinished bins at AC Moore and painted them a red to match the checkerboard curtains. I angled the shelves so the bins were better displayed, and added a small, thin strip of wood on the outside to keep the bins from slipping off the shelves. The drawer at the bottom isn't a drawer at all, but a piece of wood on a hinge disguising a little cabinet to hold the puppets. It closes using a magnet.
Puppet Show:
The sign I made out of thin plywood painted with chalkboard paint. I made a simple frame using 45 degree cuts on my table saw using molding from Home Depot.
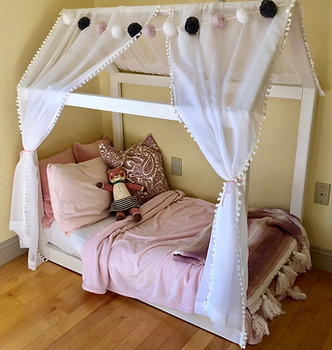
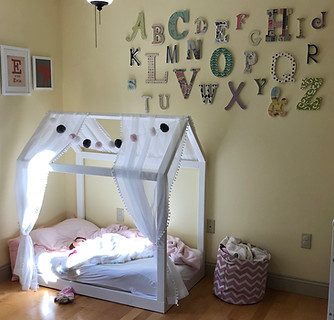
Toddler House Bed
We had just gotten our son an awesome bunk bed, so I wanted to do something special for our sweet 2 year old little girl. I followed these plans, which were simple and took me only a handful of hours. I also loved using the kreg jig for the first time to make the pocket holes. The curtains I got for super cheap at TJ Maxx, and the garland is from Hobby Lobby. In the bottom picture, the letters I made using wooden letters of all kinds from JoAnne Fabrics, ACMoore, and other places. To give them unity, I painted them all the same white, then mod-podged fun papers to them that all had the same tone.
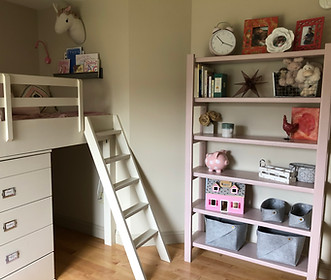
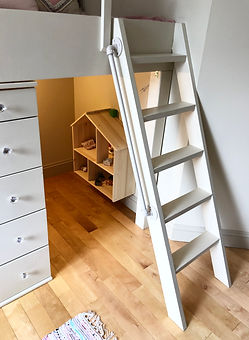
Custom Loft Bed

My little lady was fast growing out of her house bed, and because her bedroom is small (and she is a major girly-girl) I had to make something that would incorporate LOTS of storage. I'm not skilled enough yet to easily make my own chests of drawers, and I wanted to use something unfinished so I could finish the entire piece in the same color paint, giving it a custom, built in look. Three of IKEA's Tarva 5 drawer dressers fit the bill perfectly.
The Frame
I constructed the frame (44" deep, 120" long) out of 2x6's, which I screwed directly into the wall studs that surround the frame on three sides.
It may look like the dressers underneath are supporting the front, but they are not-I designed the height to be about 1/8" above the dressers.
On top of the frame, I screwed plywood-I had to use two 4'x8' sheets because of the length of the bed.
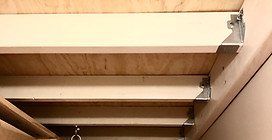
Within the frame are (8) 2x4s supporting slats which I connected to the frame using joist hangers
I attached a 2x10 to the front of the loft frame, not only because it is a nicer looking board, but it would also create a lip for the mattress. The railing itself is made out of poplar boards, which I chose for greater stability. To give it a more finished look, I beveled the ends of the railing support slats. I patched, sanded (repeat) the screw holes in the railing before painting, but unfortunately you can still see evidence of them being there (dang it!)
Railing

Ladder
I could not believe how long it took me to figure out the angles of the ladder. This easy, one hour project took me at least three. I used Ana White's tutorial as a guide. I then had pipe cut at Home Depot to the right size and attached it using elbow pieces and flanges. Luckily, I found a Rustoleum metal spray paint that almost exactly matched the paint I used.

Reading Nook
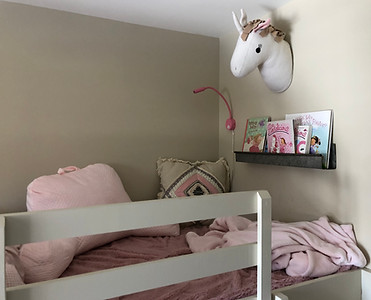
I designed the loft bed to fit a twin XL mattress plus 35" for a sweet little reading nook. I covered this little space with foam and covered it with a super soft fleece blanket to make it really cozy. I put in a husband pillow and a unicorn head from Target, the light is from Amazon (but I can't find it to give you a link) and the ledge shelf and throw pillow are from Hobby Lobby.
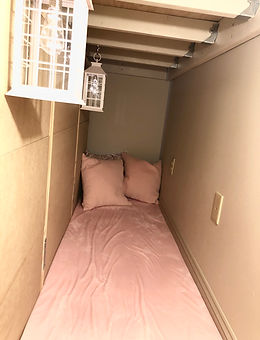
The Cave Underneath
I am a sucker for small hidden spaces and nooks. So as soon as I started designing this bed, I knew I wanted to make a cave. The dressers are really shallow (only 15" deep), so that left me with around 30" x 120" for the cave. I bought and cut some foam and fabric from Hobby Lobby, threw in some throw pillows from TJ Maxx, and $7 plastic lanterns from ACMoore, and I had an instant play cave. At the other end, I put IKEA's wall mounted doll house
Hardware
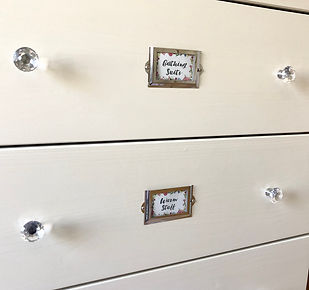
The Tarva dresser came with wooden knobs, but I wanted to give her dressers a little more bling with a vintage crystal knob. Because there are so many drawers (and I wanted to give them a certain look) I screwed label holders in between each knob.
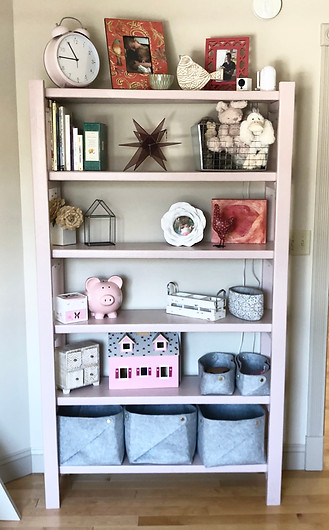
Bookcase
I found inspiration for this bookshelf after searching "diy easy bookshelf" on Pinterest, under this pin. I made two ladders out of 2x3's, each rung supported underneath by small L brackets I spray painted. The shelves themselves are 2x12's that I had Homedepot cut to size because the lumber is too heavy for me to cut by myself on my table saw. I painted the entire thing a dusty pink (Benjamin Moore's Sonoma Clay), a color I splashed throughout the room to help give her room unity. It was a really really easy bookshelf to make-but it is SUPER heavy. I anchored it in four different places to studs in the wall.
Little Lady's
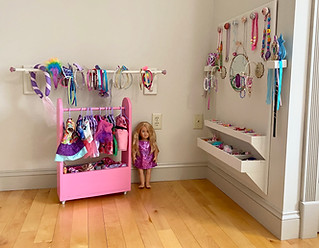
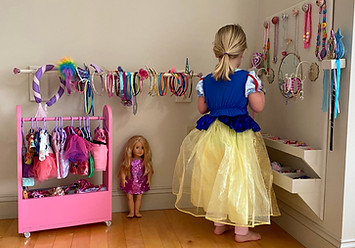
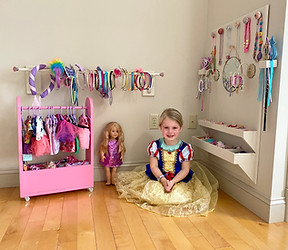
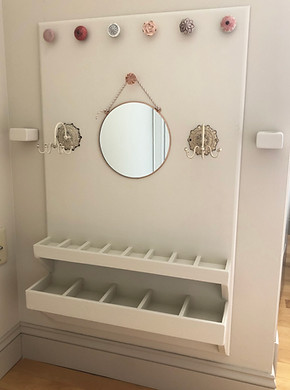
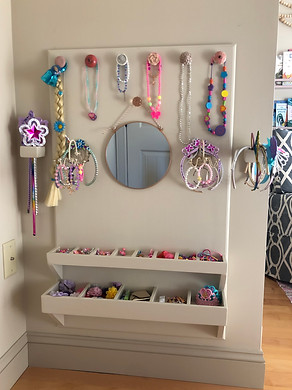
Jewelry Organizer
The bulk of the work on this organizer was the two different ring/earring/barrette trays. I made these super simple trays out of various 1" lengths of lumber and no frills smaller pieces in the moulding section of Home Depot. I made simple brackets out of wood and secured the trays with glue, screws, and the nail gun. The mirror I found for $3 at Target, the two spinning bracelet holders I found at Hobby Lobby, and all the "antique" knobs at the top I found at Hobby Lobby as well. The two little sconces on either side are simply 2x4 squares drilled with 1.5" drill press bit.
Library Shelf
We go to the library often, and I needed a place to put all our library books so they didn't get mixed up (and lost) in all out other books. A simple ledge shelf between my kiddos' rooms was the perfect solution. The galvanized letters I got at Hobby Lobby. Check out my other pipe ledge shelf to see how I did it.

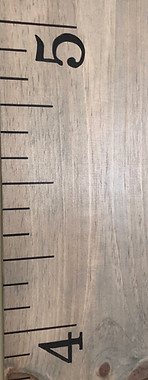
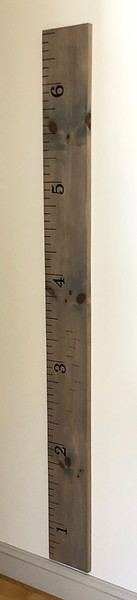
Growth Chart
DIY growth charts are really popular, and I swear SO easy.
-
Choose 1" lumber in the width and length you want. I did a 6' 1x8 board. Make sure to eye it before you buy it, it's important that the board isn't warped or cupped.
-
Sand the board, and if you want it to look worn and rustic hit it a couple of times with a chain, dent it with sharp objects, etc.
-
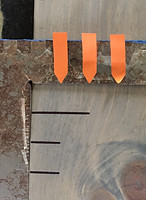
Measure your moulding and start making the growth marks with your molding in mind. Notice my 1' mark isn't 1' from the end of the board, it's 1' from the floor.
-
Using a T-Square, make a mark for each 1", the length of each mark should imitate the marks on a ruler. I did this first in pencil, then in sharpie.
-
On your computer, pick out a font you like, then print off large numbers (you'll have to play with the size before you get it right for your board and design).
-
Using a ball point pen, place the number where you want it to go, and then trace it, pressing the ball point pen down relatively hard. When you lift up the piece of paper, you'll see the number's outline indented in the wood. Take a sharpie and fill it in, and voila! You have perfectly shaped numbers.
-
Stain. I used minwax's "classic gray"
-
Polyurethane 2-3 times.
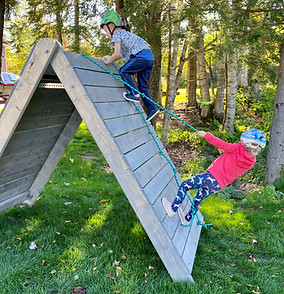
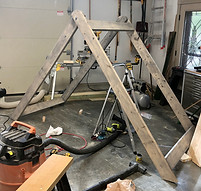
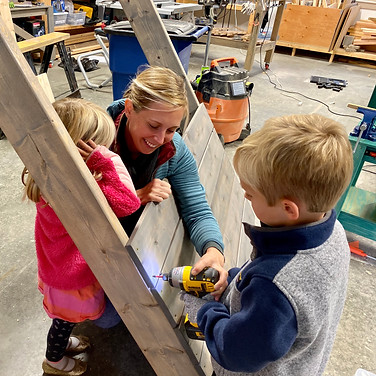
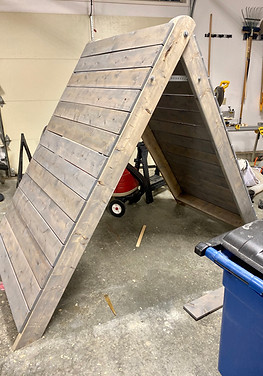
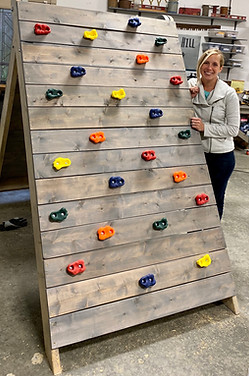
DIY Climbing Wall
I found the plans for this super fun climbing wall on Pinterest from Mincing Thoughts who provided very detailed instructions. If you want to build a portable climbing wall, I recommend using these plans too!
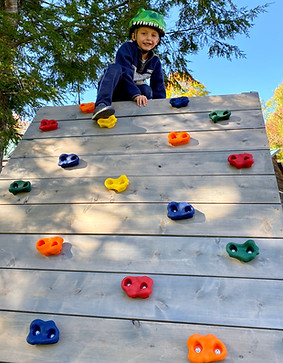


Suggestions:
-
Instead of doing a net wall, consider doing a double rope climbing wall. This will change the amount of lumber you buy, and it's really fun.
-
After buying your lumber, go through all of the plans first and figure out all of your cuts, then cut and label all your wood.
-
Sand all corners and potential splinter hazards
-
Make your frame. Stain it and poly with an outdoor polyurethane. I didn't have access to 2x6 cedar boards, so I had to buy pine for the frame and it definitely needs to be sealed.
-
While you're staining/poly-ing your frame, go ahead and stain the rest of your boards. Because these are cedar, I didn't poly them, only stained them.
-
Before attaching your climbing deck/rope deck, pre-drill all the boards (4 holes per board) using one board over and over as the template. Makes the work go quickly and all your screw holes look uniform & professional.

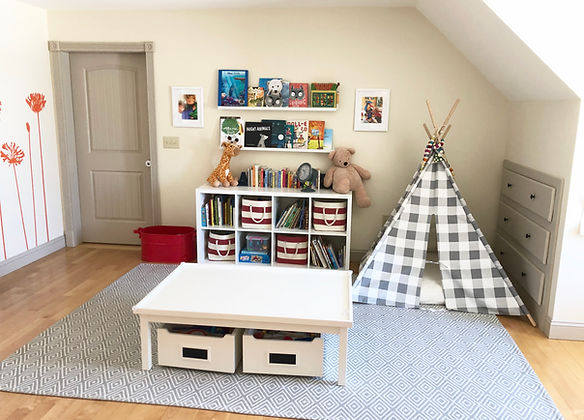
My Kiddos' Upstairs Playroom
I don't get paid for this (or anything in return)-I just thought I'd share some products that have been great for us:
-
The rug: Target
-
Ledge Shelves: IKEA (no longer available)
DIY Chore Chart

My design
My inspiration

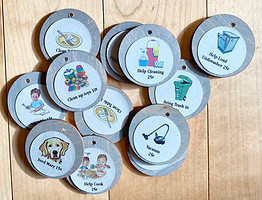
My 4 & 6 year old are ready to take on some chores and make a little bit of money. I wanted a chore chart that had super easy, quick chores. I also wanted a chart that held them accountable daily-and only paid them for work they did. Each coin has a picture that represents the chore, and the value of the chore underneath. The "D" on the top right represents "done." When either of them complete a chore they hang it on the nail in the done category corresponding to that day. If they don't do the chore, it stays hanging where it is. On the back of each coin is their initials so I know who did what that day. At the end of the week we count all the coins and add up what each kiddo is owed. Are all of these coins a bit of an overkill? Yes. But the kids love it and it hammers home getting your work done and only getting paid for work you actually did.
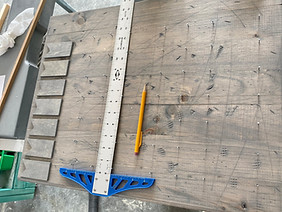
Step 1-The back board: I made this by gluing and attaching 1x3s with pocket screws (fig A & B). I then beat it up to give it a weathered look and stained it fig. C) I figured out where I wanted the chips to be and created a grid so the nails (the nails the chips hang from) were perfectly placed (fig D).

A

B

C
D
Step 2-The days of the week: I made the little banners with my band saw and thin craft wood. I stained the banners with Verathane's gray. I then spaced them out on the board using a square wooden dowel so they had visual symmatry. The days of the week are written out in black letter stickers I got from Hobby Lobby for $1.50 on sale.
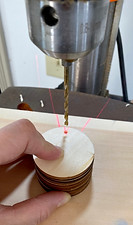
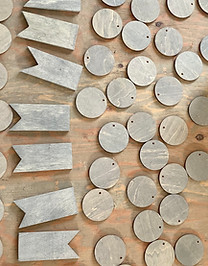
Step 3-Chore Coins: I found the wooden discs here on Amazon. I stained them with the same Verathane gray and drilled a hole at the top. I used a drill press but you could easily use a regular drill. I found clip art that represented the chores the kids like to do, shrunk it down in a pages document, and added a value underneath it. I printed the document off on gray card stock and punched it out with a 1.5" circle punch from ACMoore.


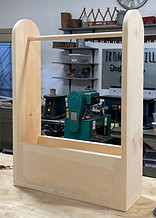
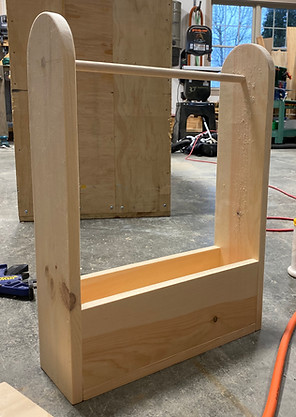
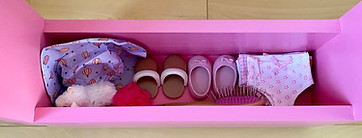
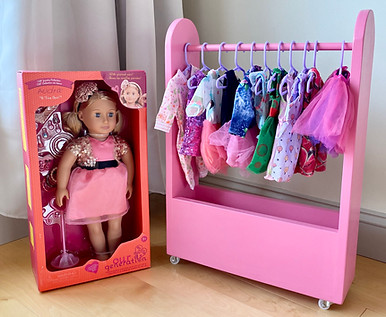
DIY Doll Dress Up Bin
This little bin will take you less than an hour to construct, so fun and so easy!
Shopping List:
1. 5/8" Dowel
2. Two 8' 1x6" select pine boards
3. Small castors (I got mine here)
4. Brad Nails or screws
5. Wood glue
6. Wood filler
7. Paint & Primer of choice
8. Doll hangers (I got mine here)
Cut list:
1. (1) 17.5" cut piece of dowel
2. (2) 24" cut pieces of 1x6" pine board
3. (3) 16" cut pieces of 1x6"
(You can have Home Depot make all these cuts for you if you don't have a chop or table saw)
Step One: Make all your cuts.
Step two: Measure at the top of the two 24" pieces, 2.75 from the top and 2.75 from the side. Using a compass, draw a half circle, like in the picture:
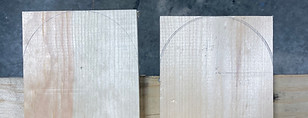
Step Three: Cut the semi-circles using a band saw or jig saw. If you don't have either, you can leave the edges square, and sand the corners to make them a little smoother/rounder.
Step Four: Drill 5/8" holes in the same point your compass used at the top of the two 24" pieces.
Step Five: Connect the sides with bottom (I used a brad nailer and glue, but you could pre-drill and use screws. Then connect the sides.
Step Six: Thread the dowel through and secure with glue
Step Seven: Use wood putty where needed, sand, then paint!

DIY Headband/Crown Holder
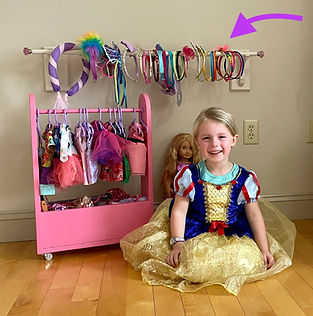
Shopping list:
(1) 6' 1x5
(1) 4' 3/4" wooden dowel
(2) Fancy knobs
(4) 1 5/8" screws
Wood Glue
Paint

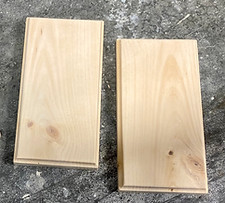
I cut the dowel down to 3', so that it extended beyond the brackets, which I placed into studs, 32" apart. To make the brackets, I cut a square of 1x6 on my miter saw, then cut it into two 45 degree triangles.
I then carved the brackets on my scroll saw, using this stencil. I used my drill press to cut 3/4" circles out of the top of the brackets, and my scroll saw again to cut a path for the dowel to go into the brackets
I then cut 3" x 8" rectangles out of the 1x6" board, and routered the edged. I attached the brackets by pre-drilling and screwing them together through the back of the rectangle.

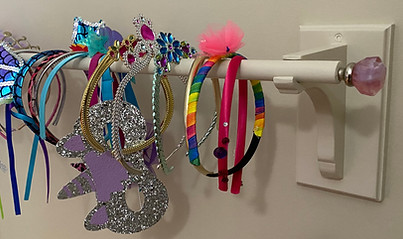
Drill holes in the end of the dowel, and insert fun knobs