

Home Projects
Quick links to projects on this page:


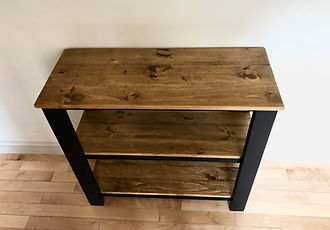
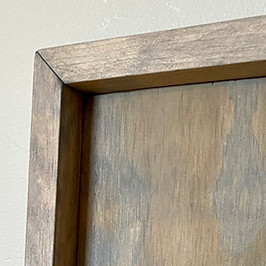
Long side table
I needed a side table to go next to a big black TV entertainment center. I started looking around on Pinterest and found my inspiration in these two pictures:


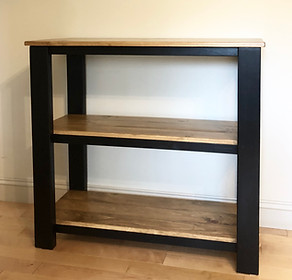
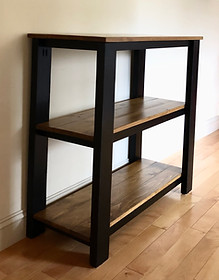
I thought, how hard could it be? So I picked up 2x4s, 1x8s, and 1x2s at Home Depot. I basically tried to throw it all together without putting much thought into the process (which came back to bite me later). The top and shelves I made by using the kreg jig and pocket screws to secure the three boards of each shelf together, then stained them with Old Masters "Natural Walnut." I had never used this stain before and immediately fell in love with it, it gives wood a beautiful slightly weathered look and really brings out the wood grain. I cut all the frame pieces, sanded, and painted them Ben Moore's black. I then set to work assembling it all. What I didn't take into consideration is that the long black 1x2s underneath the shelves needed to be almost as long as the shelves themselves, to fit behind the 2x4s to be properly secured. It required another trip to Home Depot, and a few more layers of paint before I was done.
Unit dimensions: 36.5"H x 39.75"W x 16.5" D
Shelves are 12.5" deep and I made them by ripping each 1x8 down.
My design
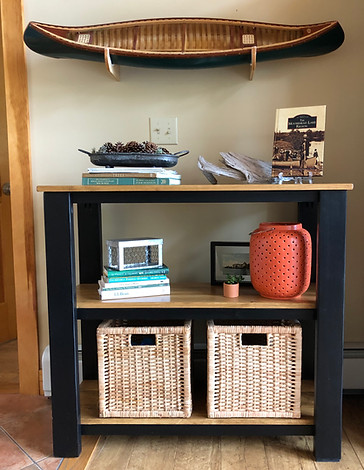
All dressed up at our lake house
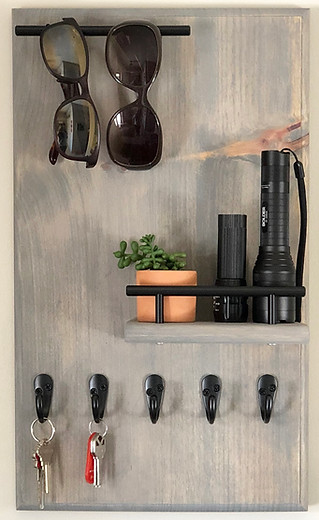
Key Organizer
I wanted to make something for my husband's birthday that would give me an excuse to play with my new router.
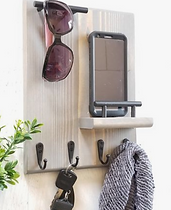
<-- I found this picture on pinterest under a post (that I can't find) on how to make $$ woodworking.
They didn't provide a tutorial, but it looked simple enough, so I created this -->
I took a scrap piece of 1x12 and cut the length to 19". I then routed the outside edges with a round bit (which is a super easy feat-but because it was my first time I made a ton of mistakes). The little shelf I cut from scrap wood as well.
The black rail and sunglass holder are simple drawer pulls I found here on Amazon. I found the hooks on Amazon as well.
Paper Organizer
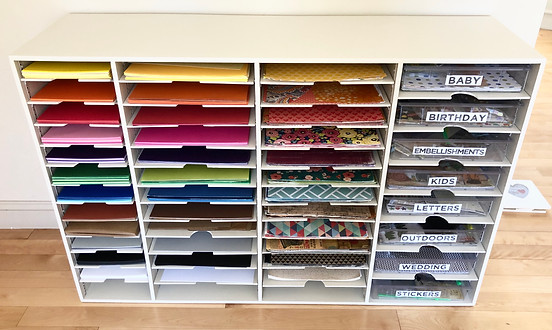
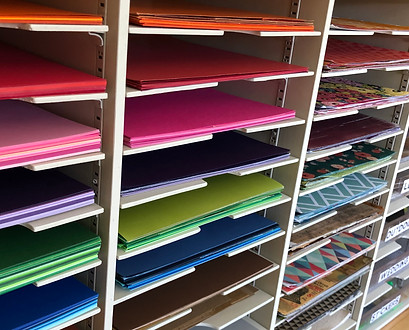

I make a lot of homemade cards for friends and family, and my papers were a mess. I could never find anything. I designed and built this unit to solve that problem. See more click here
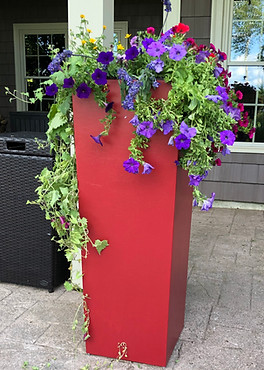
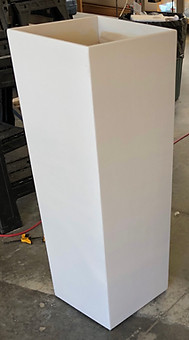
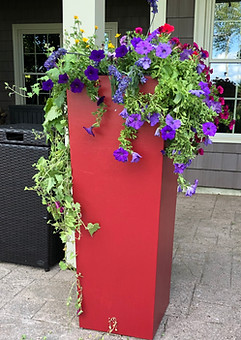
DIY Large Planter
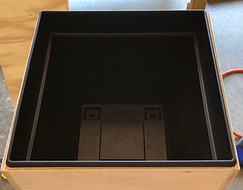
Top View
A.
I designed and created these planters for my husband on our 9th anniversary. He loves flowers and color.
Side View
B.


Shop list:
-
(2) 4'x8' 1/2" sanded plywood
-
8 brackets
-
xWood filler
-
Sandpaper
Tool list:
-
Band or table saw
-
Sander
-
Screwdriver
-
Brad nail gun
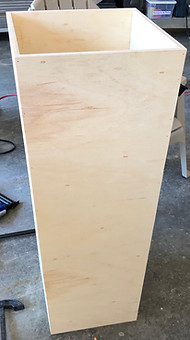
Step one: find a strong plastic planter that you can insert into your wooden one, and design your planter around it (fig. C).
Step two: Have Home Depot cut your plywood strips to size. If you want the sides tapered, get them cut at the widest measurement and then taper them at home.
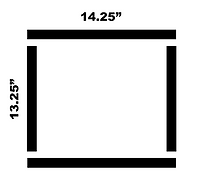
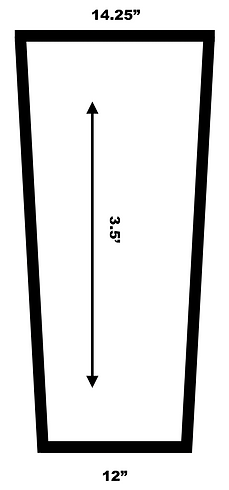
Step three: taper your sides. I did this on my band saw, but you can also do it on your table saw. I knew I wanted my bottom to be 12" wide, and my top had to be 14.25" wide, so I marked out both widths 3.5' apart (the height I wanted the planters to be) and then connected the two lines with a long straight edge (see fig. B). I then checked my angles with a speed square.
Make sure two sides are slightly longer than the other two (add the exact width of the board). So I wanted a 14.25" square, with 1/2" plywood, two sides needed to be 13.25" to make up for the thickness of the plywood (see fig. A).
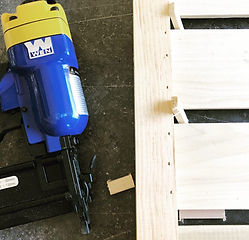
Step four: Connect your sides. I did this by glueing and clamping all the sides, then using a brad gun (I did at least 8 nails per edge).
Step five: Brackets. You want something for your plastic planter insert to sit on, and I didn't want to put a wood shelf there as it would always be wet. I already had these brackets in my shop and thought they'd do the trick! (Fig. D). But you could use anything.
C.
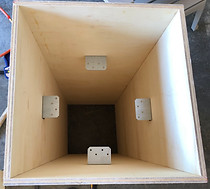
D.
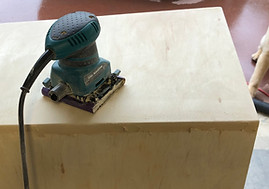
Step six: finish it. Plug all the holes, uneven parts with wood filler. Sand, clean, then prime. Lightly sand again, then paint with exterior paint.
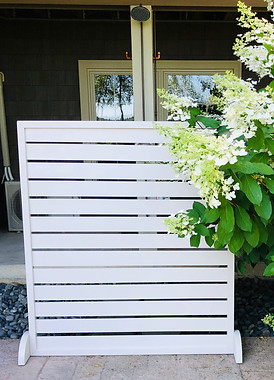
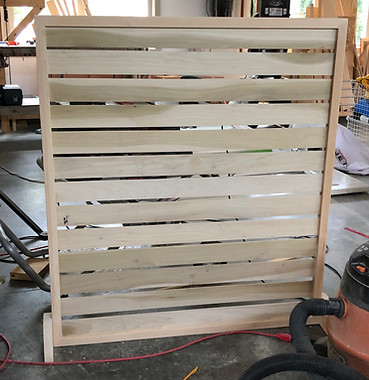
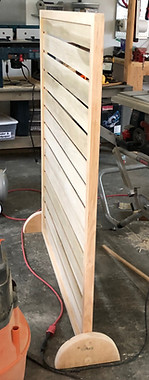
Outdoor Privacy Screen
I created this for our outdoor shower, but you could make it for anything you wanted to cover up, like trash cans


Step one: figure out how big you want your rectangle/square to be. I wanted mine to be 4 feet wide, which worked out perfectly, because Home Depot sells poplar slats in 4' sections. Plan your frame around your slats. I cut my frame (2x2s) using 45 degree angles at each end, then dadoed the middle using a router with a straight bit that perfectly accomodated the slats.
Step two: slide slats into one dadoed side, easily space them apart with dowels or wood molding cut into pieces the same size. Glue, then use a brad gun to secure. I didn't glue, and TOTALLY regret it (I know, duh).
Step three: make the bottom support feet and attach. I wanted them rounded, but you could make simple rectangles. TIP: if you're going to have this anywhere where there is even a little wind, make your feet way bigger. Mine just barely suffice for where I put mine.
Step four: Finish the project by filling all holes and painting.
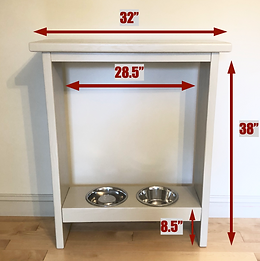
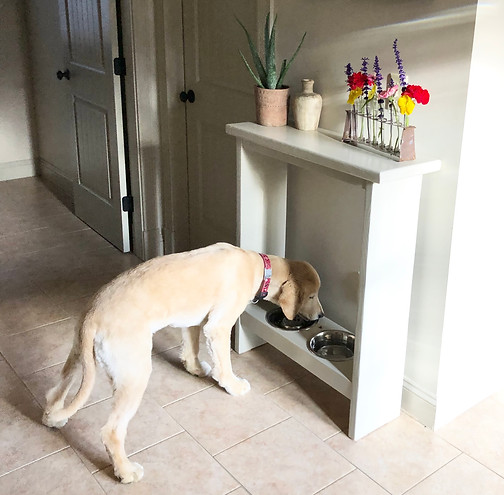
Pet Bowl Console Table
Before
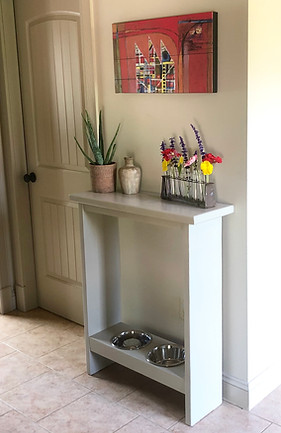
After
Step one: Measure your space. Measure how high your bowls need to be to accommodate your pet. Figure out how much lumber you'll need. My measurements
Step two: Go Shopping.
My list:
-
Two eight foot 2x8s
-
(sides & bowl shelf)
-
One 2x12
-
(table top)
-
Ten foot 1x3
-
(top and bowl support)
-
2.5" Kreg pocket screws
-
Kreg pocket wood plugs
-
Wood filler
-
Sandpaper
Tools Needed:
-
Chop or table saw
-
Sander
-
Jig saw
-
Kreg pocket hole jig
-
Drill or drill press
-
I used a hand planer, but it's not needed
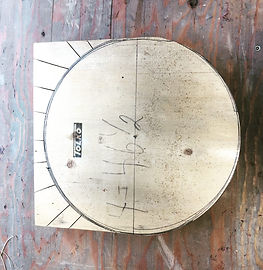
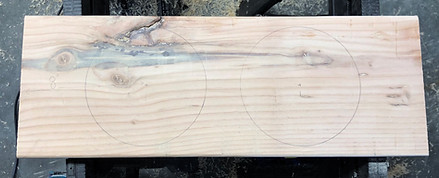
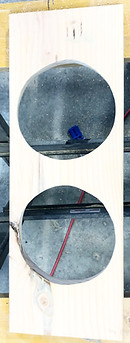
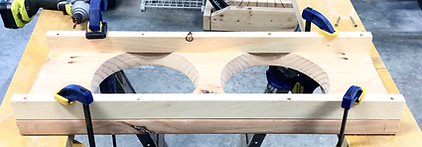
Step three: Cut all your lumber. Measure your pet's bowls, and using a compass, trace the circles out on the wood. Using a drill or a drill press, cut the initial hole into your 2x8.
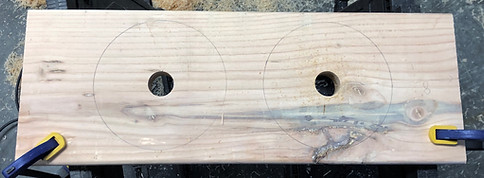
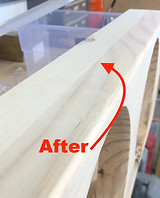
Step four: Using a jig saw, cut out the circles. Sand the interior circle and the rest of the board. Drill your pocket screws into the underside, but remember to leave room for your 1x3s (I forgot this step, and barely had room). Also, you can see what a novice I am with the hand planer-there are 2 huge snipes at the end of my board, but at least it's on the underside!

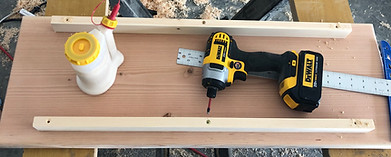
Step five: Attach your 1x3s to the underside of your table top and to the underside of your bowl shelf. Make sure it's centered
I used a hand planer on this front face, look at the difference in the after picture!
Step six: Using pocket screws, attach the top and bottom. I filled mine with the Kreg pocket wood plugs, then put wood filler over them. Make sure entire piece is properly sanded and all holes filled.

Step seven: Prime and paint!
DIY Bread & Produce Box
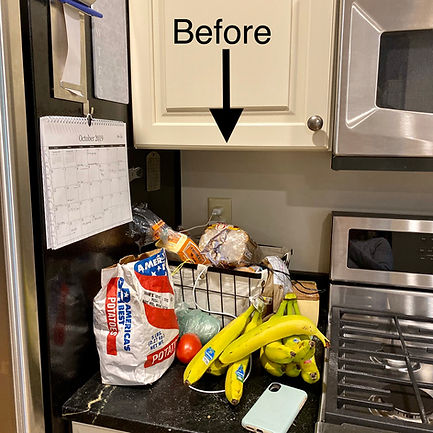
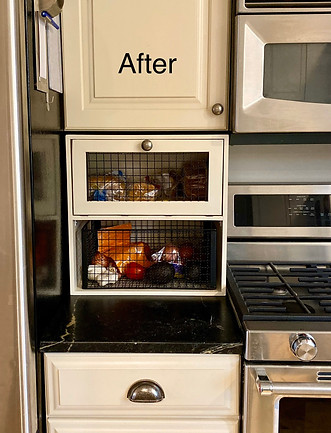
Construction: I knew I needed to fix my horrible corner counter problem. So I set out with a basic idea, found the perfect basket at Marshalls, and based my entire project around it. The box is a 18" square, 12" deep. I used 1/2" plywood scraps that I had around my shop to construct the entire thing. I placed the shelf midway, created a door that closes with a magnetic stop. Made sure the paint color and knob matched my cupboards to make it less visually noisy.
I put the box together using 45 degree angles cut into the wood, lots of wood glue, and my brad nail gun. I hung the shelf using simple brackets.
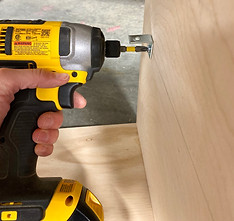
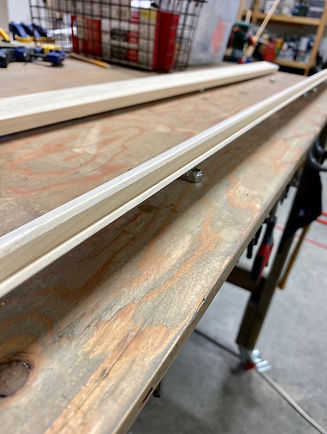
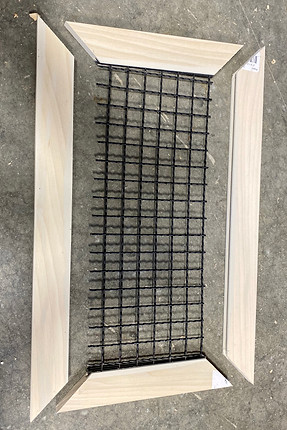
The frame of the door was a bit more complicated. I used 1/2"x 2.5" poplar wood, and ran a straight bit down the middle to create a pocket for the wire grate.
The basket had such a slightly unusual wire pattern, and I couldn't find another basket like it to cut the wire out to make the door. So I found a mostly-similar one and spray painted it a matte black to match the basket
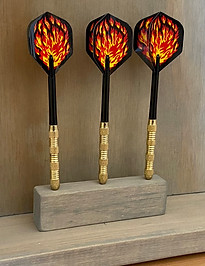
DIY Dart Backboard
Shopping List:
-
(1) 4'x3' 3/4" Plywood
-
(2) 2"x1"x6' Pine boards
-
(1) 4"x1"x6' Pine board
-
Brads
-
Wood Glue
-
Stick on chalk board sheets
-
Dart board, darts, chalk, eraser
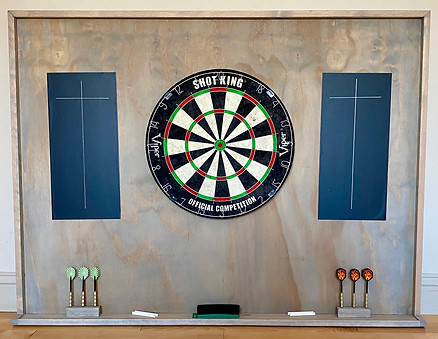
Cut List:
-Have home depot cut a sheet of 3/4" plywood to 4'x3'
Board: Length: #of pieces & what it's for
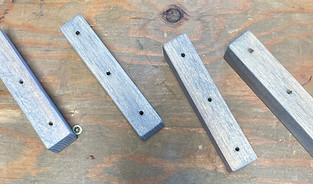
2" x 1" 49.5" (1) Top of frame, both ends cut at a 45 degree angle
2" x 1" 37.25" (2) Sides of frame, one end cut straight, the other at a 45 degree angle
2" x 1" 4" (2) Dart holder
4" x 1" 49.5" (1) Shelf along bottom, use a square dowel if you want a lip
Step one: Attach sides and top, secure with a brad gun (or brad nails) and glue.
Step two: Attach bottom shelf with brads and glue. I used a table saw at just the right height to achieve the lip on the front. But you can easily just attach a small square wooden dowel.
Step three: Stain/paint
Step four: Attach dart board, centered width wise, and 3" higher than center length wise.
Step five: Cut and attach vinyl chalk boards
Step six: Attach dart holders to shelf. I drilled and screwed them in from underneath the shelf. I drilled 3 holes in each to accommodate the needle of the darts

Top of the frame meets at a 45 degree angle

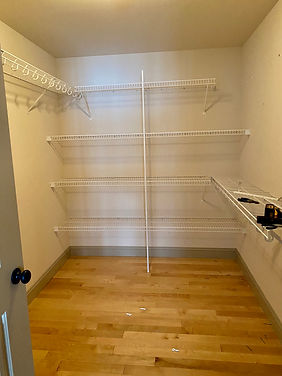
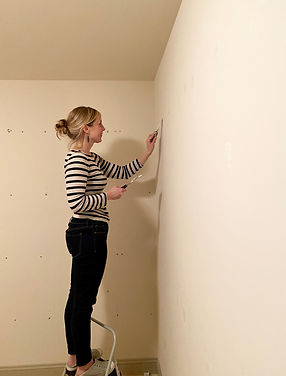
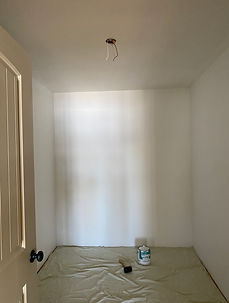
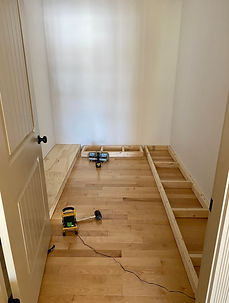
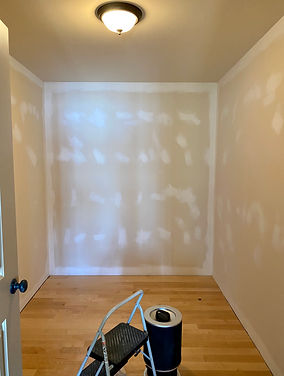
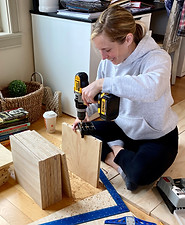
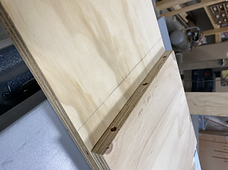
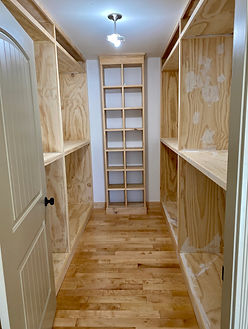
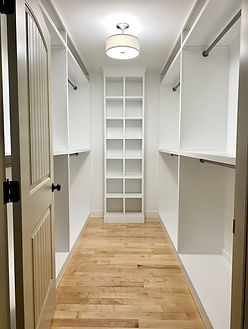
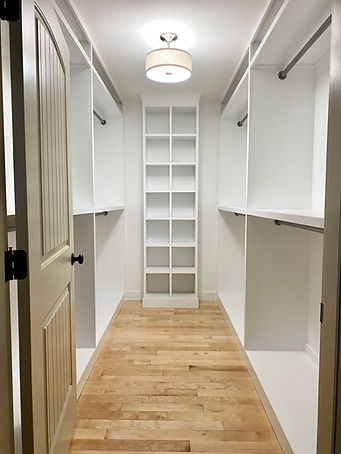
DIY Master Closet

Before ........After
I knew I had to totally redo this bedroom closet to be functional for clothing. I had absolutely no idea how to start, but after searching pinterest, I found this Bob Villa Video. There are some problems with this video-mostly that the contractor used nails in sheetrock to anchor the closet. But it gave me a starting point. See pics below for the progression:
1.
2-3.
5.
6.

7.
4.
8.
1-Clean out the mess.
2-Rip out shelving.
3-Putty the millions of huge holes. Sand. Repeat.
4-Prime all puttied holes.
5-Two coats of white eggshell paint.
6-Make 2x4 bases for all cabinets, cover with 3/4" plywood. IMPORTANT: For all your work, use construction screws (not a nail gun) and all screws need to go either into wall studs or into plywood.
7-Make the cabinets frames with 3/4" plywood. Build out the frames on the walls by using pieces of the same 3/4" plywood.
8-Attach the middle (2 sheets of 3/4" plywood sucked together using construction screws) using 1x4s as spacers & pocket screws.
Secure shelves with 3/4" x 3/4" strips of wood ripped on a table saw
Frame out the cabinets with 1x2" strips of pine
Fill holes, prime, paint!
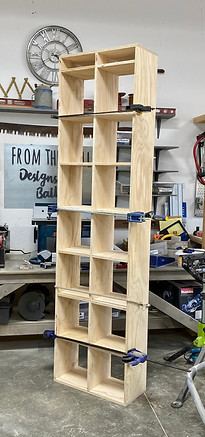
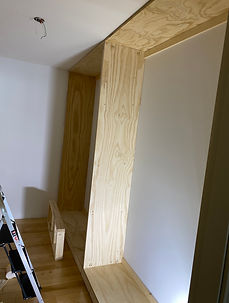
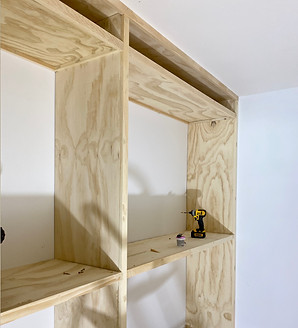
Cube Storage
I constructed this cube storage using this amazing dowel jig.
The cubes I put in it I found here on amazon.
The molding I made with a series of square dowels.

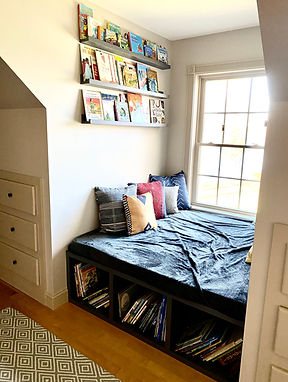
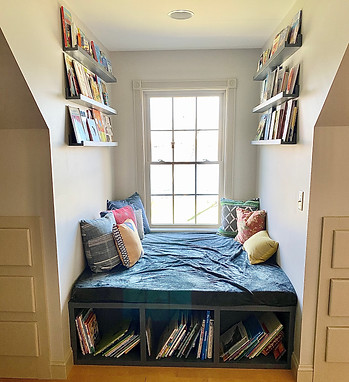
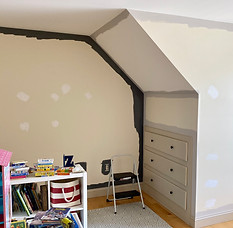
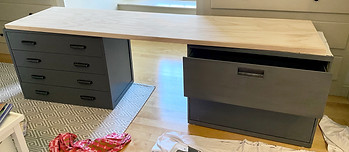
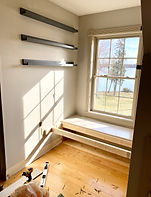
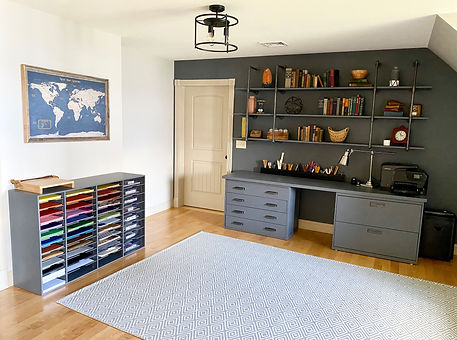
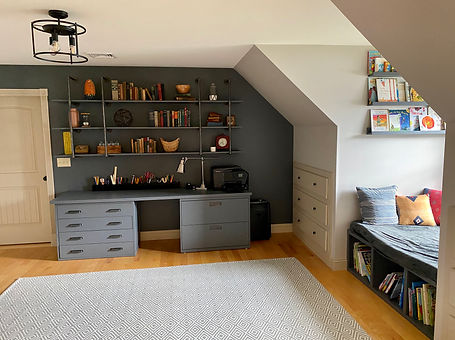
Home Office
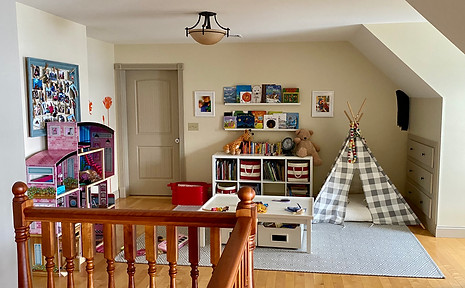
Before
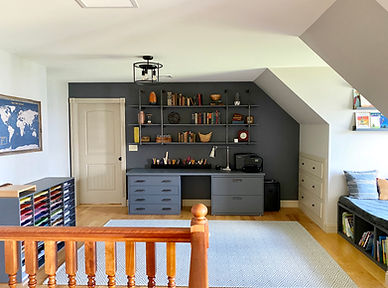
After
I've spent any free second of the quarantine working on creating an office space in a section of the upstairs that doesn't get much use. I wanted a place for office work/crafting, and also a large area for the kids and I to snuggle and read
During this time, I didn't document much of my process. With school shut down and having to homeschool the kids (and never having a moment to myself) whenever I did have a break, I got right down to business. Here is what I can tell you:
-
The dark gray color of furniture, shelving, and walls is Benjamin Moore Stormy Sky.
-
Rug is indoor/outdoor rug from Target
-
Most of the pillows I got from society6.com
-
Semi flush-mount is from Lowes
-
World map is a custom pin-board map of our family travels I got here from etsy.
-
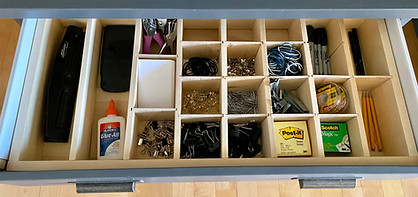
The craft paper organizer I built last year, and painted it to match the desk. Click here to see how I built it.
-
I built the six easy ledge shelves with three pieces of wood, wood glue, and a brad gun. Click here to see Ana White's plans.
-
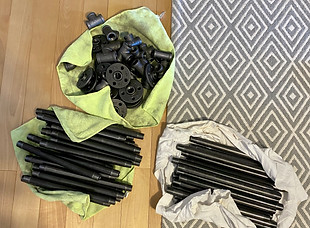
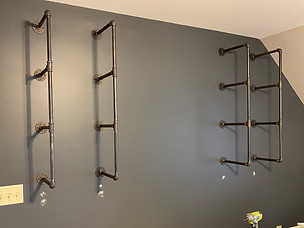
Pipe Shelves: The black iron 1/2" piping I got at HomeDepot.com, I ordered in packs of 4 to make it more economical. What you see, just in piping, is around $225. To complete this project you need flanges (the piece that attaches to the wall), pipe nipples (the actual pipe that the shelf sits on), 90 degree elbows, and pipe tees all in 1/2". They're very greasy with an industrial coating to prevent rust. I simply buffed most of it off with a dry rag. Not sure if that's what I'm supposed to do, just seemed more logical and easier than washing them with soap and water and then re-sealing them.
-
The desk top & drawers I made (do not ask me how I made the drawer unit, I made so many ding dang mistakes I have no idea how it even all came out). The desk top is two layers of 3/4" plywood screwed together, faced with pine, and painted. The filing cabinet (right side) I already had and painted to match.
-
The day bed I made super sturdy by framing it underneath with 2x4s & joist hangers. I then put a 3" queen memory foam mattress topper on it, and sewed a blanket onto it to made an easy mattress cover.
-
The cube storage underneath the day bed I created with 3/4" plywood and framed with pine.
Fake Book Spines
Our contractor created beautiful built in shelves and drawers for our bedroom. The only problem was the previous contractor had a venting pipe come through a wall into the bedroom, and then out an exterior wall (who on earth knows why). So we had to build around this awful pipe. Our contractor hid it with a box:
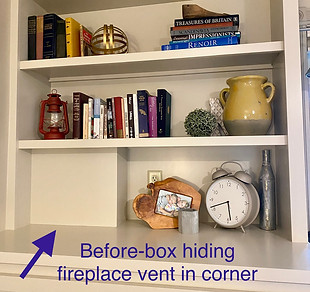
I created some fake book spines to hide this spot.
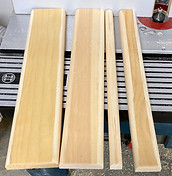
1. Pick different width 1" lumber. These are your "spines."
2. Router or sand the edges so they're rounded and look more "spine" like (pic 1).
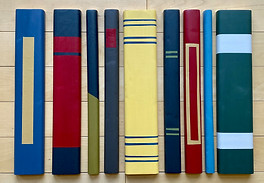
3. Put different base paints on the spines. Make sure they're all a similar tone.
4. Look up book spines on google images and using frog tape, try to re-create the designs (pic 2).
5. Using different fonts & font sizes on a cricut maker, create the titles. I also used transfer tape to make the letters perfectly in line (videos).
6. Create an end piece in the same color as the last spine (see pic 3). I also sanded the books in spots to make them look used.
#1.
#2.
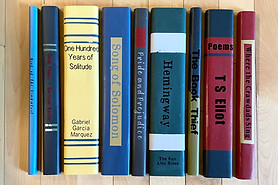

#3.
Custom Kitchen Cabinets for my home

As a woodworker, this was by far and away my hardest project. Custom cabinetry is no joke-and I made a lot of mistakes along the way. I was so grateful to be able to create the cabinets I've always wanted, but promised myself I'd never build another cabinet again. And about a month later, I immediately started to renovate my laundry room...and built more cabinets.


Laundry Room Renovation


